CATEGORIES
- A free account
- Account assistants
- Account Information
- Affiliate Program
- Appearance
- AppSumo
- Audio & Video
- Branding / Custom / Whitelabel
- Branding Tool
- Break-out Rooms
- Call to Action
- Camera & Microphone
- Capacity & Limits
- Closed captioning
- Decisions - Professional Voting
- Event tokens
- Evergreen webinars
- Forms
- How to join meeting on mobiles
- Hubspot Integration
- Integrations
- Language interpretation
- Live Transcription
- Meetings & Webinars
- Other
- Pabbly Connect
- Paid Webinars
- Presence Manager
- Recording
- Registration
- Requirements
- Room Chat
- Screen Sharing
- Session Management
- Statistics & Reports
- Storage
- Streaming
- Sub-Accounts
- Tests & Surveys
- Virtual Backgrounds
- Vote Manager
- Waiting rooms
- Webinar and Meeting Room Features
- Website Presenter
- Whiteboard
- Wordpress plugin
FAQ -> Storage -> What options can I use in Storage and how to manage files?
What options can I use in Storage and how to manage files?
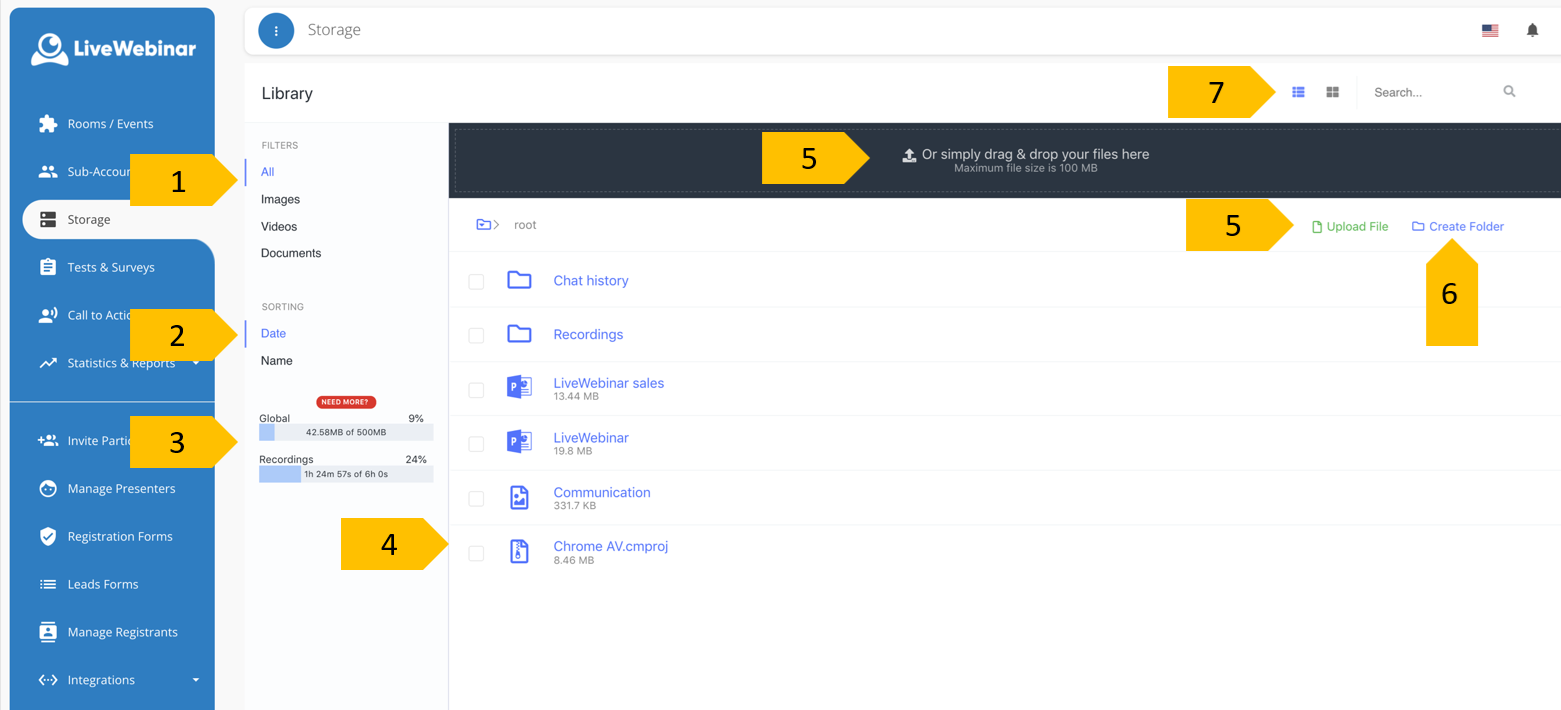
Here’s a quick overview of the Storage module in LiveWebinar.
 1. All your files – here you will have all the files you uploaded to Storage, divided into Images,
Videos and Documents.
2. Sorting – you can sort your documents by date or by name.
3. Free space indicator – here you can check how much free space you still have.
4. List of your files – this is your list of sorted and unsorted files.
5. Upload files – you can drag & drop the file to upload it or click on “Upload file”.
6. Create folder – create a new folder.
7. Change View & Search – change the way you view your files or search for specific files.
File management
LiveWebinar gives you a few options to manage your existing files and how to upload new ones.
 To upload your files, you can either drag and drop the file to the blue bar, or click “Upload file” (1). You have multiple options with which you can manage your files, to access them, hover over the file and click the three dots that appear.
1. Upload your files – drag and drop your files or click to upload.
2. Share with subaccounts – share the file with your subaccounts.
3. Details – check the detailed information about your file, see more in the screenshot below.
4. Download – download the file to your device.
5. Rename – change the name of your file.
6. Move – move the file to a different folder.
7. Delete – delete the file entirely.
By opening the “Details” tab, you can access additional options, such as sharing the URL for the document, when the document was uploaded, what type of document it is, and the same file management options as listed above.
